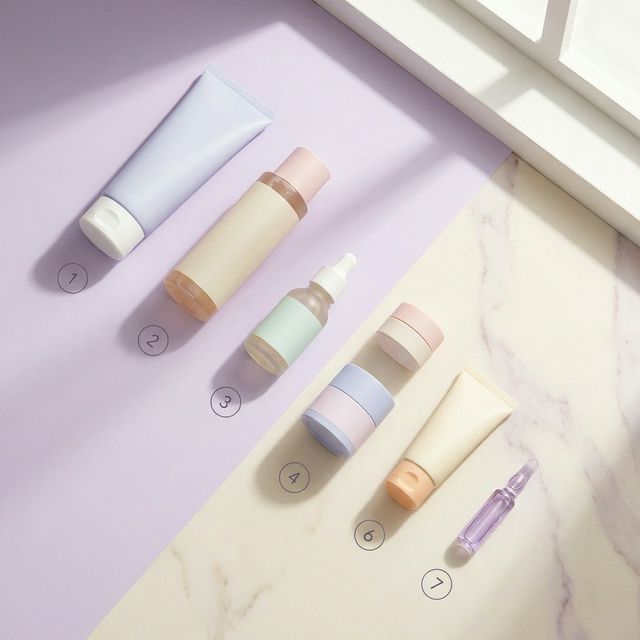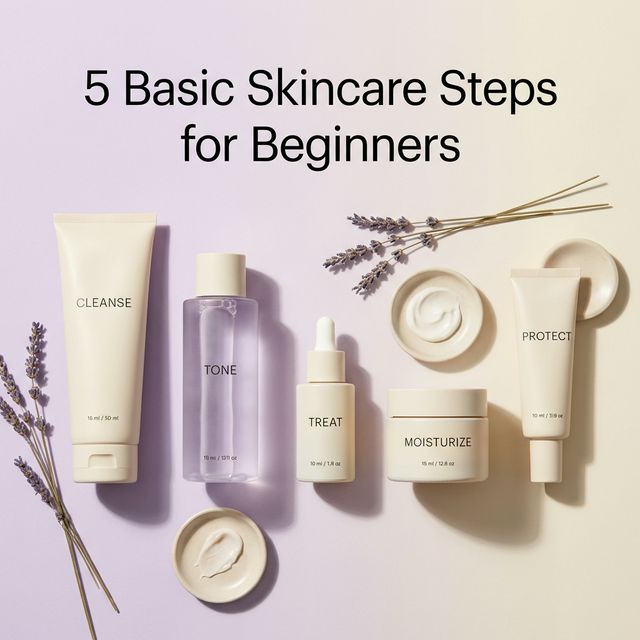
You don’t need a 10-step routine to get good skin. You don’t even need 7 steps. Five steps is the sweet spot — enough to cover every essential function your skin needs, simple enough to stick with every day. This guide breaks down each step, explains why it matters, and shows you exactly how to do it right.
If you’ve been scrolling through skincare routines online and feeling overwhelmed, this is your starting point. Five products. Two routines (AM and PM). Results you can actually see in 4–6 weeks.
At a Glance
- 5 steps cover everything — cleanse, tone, treat, moisturize, protect
- AM routine = 4 steps — cleanser, toner, moisturizer, SPF (serum optional in AM)
- PM routine = 4 steps — cleanser, toner, serum/treatment, moisturizer (no SPF)
- Order matters — thin to thick, water-based before oil-based
- Consistency beats complexity — a simple routine done daily outperforms a complex one done sometimes
Start here → Routine Order & Layering Hub — your complete guide to building, ordering, and troubleshooting skincare routines.
60-Second Self Check
Which of these describe you right now?
Your routine situation:
- You don’t have a routine at all — you wash your face and that’s it
- You’ve tried routines but gave up because they felt too complicated
- You own products but aren’t sure what order to use them in
- You’re spending money on skincare but not seeing results
What’s happening with your skin:
- Skin looks dull, uneven, or tired
- Occasional breakouts, dryness, or oiliness you can’t control
- Products feel heavy or pill when you layer them
- You’re not sure what your skin actually needs
→ 2+ checks? This 5-step framework will give you a clear, manageable routine that covers all the bases.
The 5 Steps: What They Are and Why They Matter
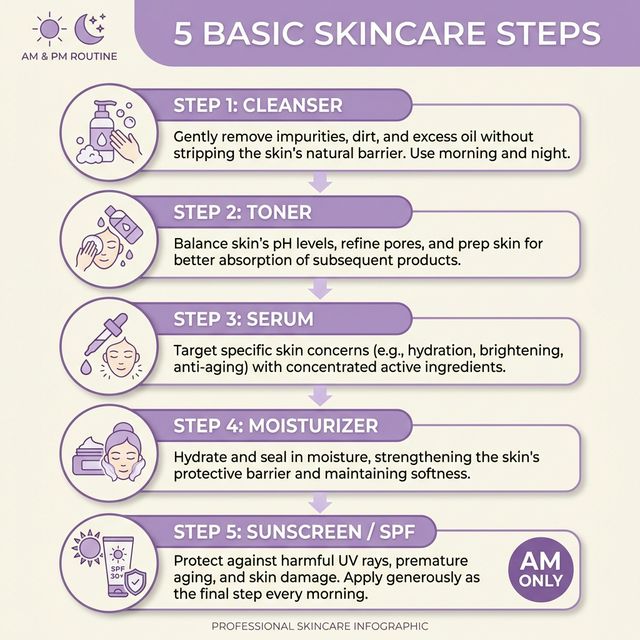
Each step in this routine has a specific job. Skip one and you leave a gap. Do all five and you’ve covered every function your skin needs — cleansing, prepping, treating, hydrating, and protecting.
Step 1: Cleanser — Clear the Canvas
What it does: Removes dirt, oil, sunscreen, makeup, and pollution residue from your skin. Everything you apply afterward needs a clean surface to work properly.
What to look for:
- Gentle, sulfate-free formula (avoid SLS/SLES — they strip the barrier)
- pH 5.0–6.0 (close to skin’s natural pH)
- Fragrance-free if you’re sensitive or reactive
- Gel for oily skin, cream or milk for dry skin
How to use it:
- AM: Gentle cleanser or just water — your skin hasn’t gotten dirty overnight
- PM: Full cleanse. If you wore sunscreen or makeup, double cleanse — oil-based cleanser first to dissolve SPF/makeup, then your regular cleanser
How long: Massage for 60 seconds. Most people rush this. A full minute of gentle massaging makes the difference between surface cleaning and actually clearing your pores.
Your cleanser shouldn’t make your skin feel “squeaky clean.” That tight, stripped feeling means you’ve damaged your moisture barrier. After cleansing, skin should feel clean but comfortable — not dry, not tight, not stinging.
Step 2: Toner — Prep and Rebalance
What it does: Rebalances your skin’s pH after cleansing, adds a layer of lightweight hydration, and helps subsequent products absorb better. Think of it as priming your skin.
What to look for:
- Hydrating toner (beginners): Look for hyaluronic acid, glycerin, or centella asiatica
- Exfoliating toner (after you’re established): Contains AHA or BHA for texture and congestion — but not for day one
- Alcohol-free — drying alcohols strip moisture and irritate
How to use it:
- Pour a coin-sized amount onto your palm or a cotton pad
- Pat gently onto face and neck — don’t rub
- Apply to slightly damp skin for better absorption
When to skip it:
- If your cleanser is already gentle and pH-balanced, a toner is nice but not critical
- If you’re on an ultra-minimal budget, this is the step you can cut first
See also: Proper Skincare Routine for Beginners — when a 3-step routine is enough and when to add more.
Step 3: Serum — Target Your Concern
What it does: Delivers concentrated active ingredients deep into the skin. This is where you address specific concerns — dullness, dark spots, fine lines, redness, dehydration.
What to look for (pick ONE for your main concern):
| Concern | Best Starter Serum | Why |
|---|---|---|
| Dullness / uneven tone | Vitamin C (10–15%) | Antioxidant, brightens, protects against UV damage |
| Dehydration | Hyaluronic acid | Pulls moisture into skin, plumps fine lines |
| Redness / sensitivity | Niacinamide (5–10%) | Calms inflammation, strengthens barrier |
| Fine lines / aging | Peptides | Supports collagen without irritation |
| Acne / congestion | Salicylic acid (BHA) | Unclogs pores, reduces breakouts |
How to use it:
- Apply 2–3 drops to clean, slightly damp skin
- Press and pat onto face — don’t drag or rub
- Wait 30–60 seconds before the next step
Key rule: One serum, one target. Don’t stack three serums because you saw it on TikTok. Start with one that addresses your primary concern. Once your skin is stable (4–6 weeks), you can consider adding a second — AM and PM, not both at once.
Don’t start with actives on day one. If you’re building a routine from scratch, use steps 1, 2, 4, and 5 for the first 2–4 weeks. Let your skin adjust to consistent cleansing and moisturizing before adding a serum. This prevents the “I started a new routine and broke out” panic.
Step 4: Moisturizer — Lock In Hydration
What it does: Seals in all the hydration and actives you’ve applied. Strengthens your skin barrier, prevents trans-epidermal water loss (TEWL), and keeps skin soft and resilient. Every skin type needs this — even oily skin.
What to look for:
- Oily/acne-prone skin: Lightweight gel-cream, oil-free, non-comedogenic
- Dry skin: Rich cream with ceramides, glycerin, shea butter, or squalane
- Sensitive skin: Fragrance-free, minimal ingredient list, ceramide-based
- Combination skin: Gel-cream all over, richer cream on dry patches only
How to use it:
- Nickel-sized amount for the entire face
- Apply after serum has absorbed (30–60 seconds)
- Gently press into skin in upward motions
- Don’t forget your neck
AM vs. PM:
- AM: Use a lighter formula that layers well under sunscreen
- PM: Can use a richer, heavier formula — your skin repairs overnight and benefits from extra moisture
See also: What Happens When You Skip Moisturizer — the real downstream effects of skipping this step.
Step 5: Sunscreen (AM Only) — Protect Everything
What it does: Shields your skin from UV damage — the single biggest cause of premature aging, dark spots, uneven texture, and skin cancer. Without SPF, every other step you do is partially undone by sun exposure. This is the most important step and the one most people skip.
What to look for:
- SPF 30 minimum, SPF 50 preferred
- Broad spectrum (protects against UVA + UVB)
- A formula you’ll actually wear daily — texture matters more than brand
- Mineral (zinc oxide/titanium dioxide) for sensitive skin
- Chemical (avobenzone, homosalate) for cosmetic elegance under makeup
How to use it:
- Apply as the last step of your AM routine, after moisturizer
- Two finger-lengths of product (about ¼ teaspoon for the face)
- Pat gently — don’t rub aggressively, which reduces coverage
- Reapply every 2 hours if exposed to direct sunlight
When it’s PM: Skip this step entirely. Sunscreen is morning-only. At night, your skin repairs itself — it doesn’t need UV protection.
Sunscreen is the most cost-effective anti-aging product you can own. A ₹500 SPF 50 will do more for wrinkle prevention than a ₹5000 serum without sun protection. If you do nothing else from this guide, wear sunscreen every morning.
The 5-Step Routine: AM & PM
AM Routine (5 Steps)
- Cleanser — gentle wash or water rinse, 60 seconds
- Toner — pat onto damp skin, hydrating formula
- Serum (optional in AM) — vitamin C or antioxidant
- Moisturizer — lightweight, let absorb 1–2 minutes
- Sunscreen — two finger-lengths, always the final step
PM Routine (4 Steps)
- Cleanser — double cleanse if you wore SPF or makeup
- Toner — hydrating or gentle exfoliating (2–3× per week)
- Serum — targeted treatment for your main concern
- Moisturizer — richer formula, skin repairs overnight
Your AM and PM routines should look different. AM is about protection — lighter products plus SPF. PM is about repair — treatments and richer moisturizer. Don’t use the exact same products for both.
How to Start: Week-by-Week Introduction
Don’t add all 5 products on the same day. Your skin needs time to adjust to each new product. Here’s the safe introduction schedule:
| Week | Add This | Why |
|---|---|---|
| Week 1–2 | Cleanser + Moisturizer | Establish the foundation — clean and hydrate |
| Week 3 | Sunscreen (AM) | Add UV protection once skin is stable |
| Week 4 | Toner | Extra hydration layer, pH rebalancing |
| Week 6+ | Serum | Address specific concerns once basics are solid |
Why this order? Your skin needs to adjust to being consistently cleansed and moisturized before you add active ingredients. Introducing everything at once makes it impossible to identify what’s causing problems if your skin reacts.
Common Mistakes
1. Starting With Too Many Products at Once
Buying a full 5-product set and starting everything on the same day is the fastest way to irritate your skin — and then blame the products. If you get a breakout, redness, or dryness, you won’t know which product caused it.
Fix: Introduce one new product every 1–2 weeks. Follow the week-by-week schedule above.
2. Skipping Sunscreen Because “I Don’t Go Outside Much”
UV rays penetrate windows. You get UV exposure walking to your car, sitting near a window, running errands. “I’m mostly indoors” doesn’t mean zero exposure — it means less, but still enough to cause cumulative damage.
Fix: Wear SPF 30+ every morning, indoors or out. Make it as automatic as brushing your teeth.
3. Using the Wrong Cleanser
If your face feels tight, dry, or “squeaky clean” after washing, your cleanser is too harsh. This strips your moisture barrier, which then overproduces oil to compensate — creating a cycle of oiliness and dryness.
Fix: Switch to a gentle, sulfate-free cleanser with a pH of 5.0–6.0. See Why Skin Feels Tight After Washing for the science behind this.
4. Applying Products in the Wrong Order
Moisturizer before serum means the serum can’t penetrate. Sunscreen under moisturizer reduces UV protection. Order isn’t a suggestion — it directly affects whether products work.
Fix: Always thin to thick. Cleanser → Toner → Serum → Moisturizer → Sunscreen. The 5-step order in this guide is the correct sequence.
5. Expecting Overnight Results
Skin cell turnover takes 28–40 days. Most products need 4–12 weeks to show visible results. If you switch products after 1 week because “nothing happened,” you never gave them a chance.
Fix: Commit to your routine for at least 6 weeks before evaluating. Take weekly photos in the same lighting to track changes you might not notice in the mirror.
FAQ
Is a 5-step routine enough for good skin?
Yes. A 5-step routine covers every essential function: cleansing, prepping, treating, moisturizing, and protecting. Most dermatologists recommend a similar framework. You can add more steps later for specific concerns, but 5 steps gives you a complete foundation. A consistent 5-step routine delivers better results than an inconsistent 10-step one.
What if I can only afford 3 products?
Start with cleanser, moisturizer, and sunscreen — the three non-negotiables. These cover the most critical functions (clean, hydrate, protect). Add toner and serum when budget allows. See Proper Skincare Routine for Beginners for the essential 3-step foundation.
Do I really need toner?
Toner is the most optional of the 5 steps. If your cleanser is gentle and pH-balanced, and you’re using a hydrating moisturizer, toner adds a nice boost but isn’t critical. It becomes more valuable when you switch to an exfoliating toner (AHA/BHA) for texture concerns — but that’s a later addition, not a day-one essential.
Can I use the same products for AM and PM?
You can use the same cleanser, toner, and moisturizer for both routines. The differences: skip sunscreen at night (not needed), and use your treatment serum in PM when skin repairs. You might want a lighter moisturizer for AM (under SPF) and a richer one for PM, but it’s not mandatory.
How long does a 5-step routine take?
About 3–5 minutes per routine, including 30–60 second wait times between layers. The AM routine takes slightly longer because sunscreen needs a minute to set before makeup or going outside. If your routine takes longer than 7 minutes, you’re probably over-applying or waiting too long between steps.
The Bottom Line
Five steps is all you need to build a foundation for healthy skin:
- Step 1: Cleanser — clear the canvas
- Step 2: Toner — prep and rebalance
- Step 3: Serum — target your concern
- Step 4: Moisturizer — lock in hydration
- Step 5: Sunscreen (AM) — protect everything
Start with the basics (cleanser + moisturizer + SPF), add one product at a time, give each product 4–6 weeks, and stay consistent. The best routine isn’t the most expensive or the most complicated — it’s the one you actually do every day.
Not sure which products are right for your skin? Start a skin scan for a personalized routine based on your skin type, concerns, and goals.
Related Guides
- Routine Order & Layering Hub — complete guide to product sequencing and layering
- 7-Step Skincare Routine: What Actually Matters — which steps are essential vs. optional in a fuller routine
- How to Build a Skincare Routine from Scratch — the step-by-step framework for building a personalized routine
This content is for informational purposes only and does not replace professional medical advice. Consult a board-certified dermatologist for personalized treatment recommendations.